An introduction to 3D printing
Technical articles –Over the last few months I have been drawn into the world of 3D printing (somewhat unexpectedly: it all started with an object I wanted to make...). I started printing things on printers I had access to in a fablab, and then I ended up buying a 3D printer of my own.
When I started my first project of 3D printing an object, I tried to look for information about 3D printing in general, and I struggled a bit. In fact, 3D printing is a really broad field, and I could not find a single resource that answered all the questions that a complete beginner who knew nothing about 3D printing, like me at this time, had.
So this article aims to be that resource: an introduction to 3D printing for anyone wondering what it is, and who might want to make some creations (whether with a printer of their own, or by paying someone to print the object). I will not go into too much detail (because then we would get into very specific topics), but by the end of this article, you should already have a much clearer understanding of the subject.
"3D printing": what are we talking about?
Before we start talking about "3D printing", we need to know what exactly we mean by this term.
3D printing is also called "additive manufacturing". This means that parts or objects are made by progressively adding material, unlike other techniques such as moulding, deformation or subtractive manufacturing (we start with a large block of raw material that we progressively cut to get the object we want).
You might think that 3D printing is something very recent, and that it refers mainly to the production of small plastic objects. But actually, it is much more broad than that: 3D printing, which has been around for a few decades now, began with industrial applications (prototyping, production of specific objects, etc.). For example, here is what can be called a "3D printer" which uses concrete:
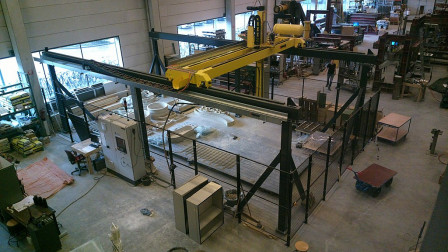
We can also mention medical prostheses (especially dental crowns). Recently, we have even seen companies using 3D printing to make... houses (by superimposing layers of concrete).
3D printing techniques
There are several ways to do 3D printing. Here are the most common ones:
FDM
FDM stands for "fused deposition modeling". This is the most common technique used by individuals, and is often the one you think of directly when you hear "3D printing" (even if it is only one of the techniques). This is the one I am going to talk about in this article.
You probably already have seen it in a timelapse video: an FDM print consists of starting with an empty tray, heating a plastic (most often in the form of filament) so that it becomes liquid, and making it come out of a print head that can move in all three axes (width, depth, height). Progressively, the printer builds an object by depositing the plastic.
Here is a timelapse video of an FDM print:
FDM printing is relatively easy to implement, and is not very expensive (both for the price of the printers and the materials), hence its success.
SLA
SLA (stereolithography) is another printing technique, also relatively accessible although less common.
Here, the material is a resin in liquid form, which at the beginning of the printing process is located in a tray. The tray is dipped into the tank, and a laser targets specific areas on the tray to solidify the resin and create an object. As with FDM, the printing is done layer by layer... a difference being that here, the printed object is "upside down".
Here is a timelapse video of an SLA print:
SLA printing is more difficult to master than FDM printing, but can produce more detailed and therefore more beautiful prints, especially for decorative objects.
Other techniques
The other techniques are more restricted to industrial situations, so they are less common.
For the most part, they are derivatives of the two methods mentioned above; for example, Selective Laser Sintering (SLS) is similar to SLA, but instead of liquid resin, powder is used.
Those who are curious can read this article or this one.
FDM 3D printers
There are many different brands of FDM 3D printers, and even more different models. However - and although some strange models do exist - you will see that all models are actually looking very similar, and have the same external appearance. This is normal, they are composed of the same elements (just like a laptop is composed of a keyboard, a screen, a touchpad...)
In fact, contrary to what one might think, the difference in print quality between an entry-level printer ($200-300) and a high-end or even professional printer (where one is closer to $5000-10000) is not really that big: where high-end printers will stand out is more on "bonuses" and secondary features that will simplify the work of the user (automatic alignment, double print head to have several colours at the same time, customer service available 24/7...)
Thus, with an entry-level printer, you will be able to make prints as good as other more expensive printers, but you will spend more time tinkering with it and adjusting it so that the print is successful.
Let's go through each of these elements in detail to understand what they are used for.
Axes
As you might expect, on a 3D printer there are... 3 axes (that's why we call that 3D 😄) on which the print head can move: width (often noted X), depth (often noted Y), and height (often noted Z).
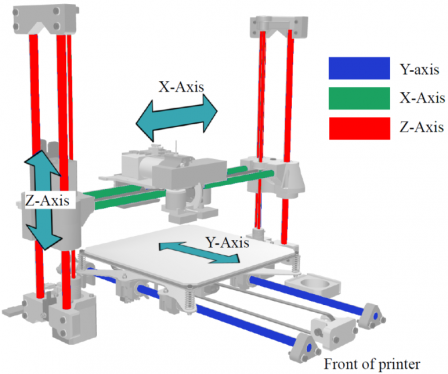
The X axis is the same on most printers: the print head is driven by a belt on an axis.
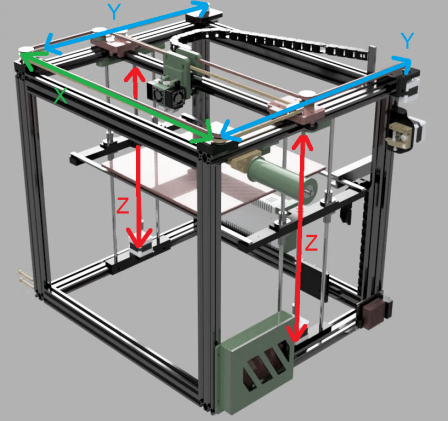
For the Y axis, there are two different types: either the head moves (in which case the printer is cube-shaped), or the bed moves in depth (in which case the head does not need to move). In general, X and Y moving heads are found on more expensive printers, although there are exceptions.
For the Z-axis, again there can be two possibilities: either the print head (and the X-axis with it) moves up, or the bed moves down.
Here is another example of a printer with a Y axis on the head and a Z axis on the bed:
Print head and extruder
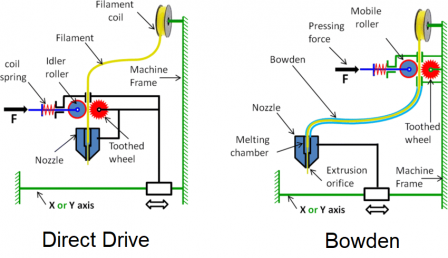
The print head (also called "hot end") is where the plastic filament is heated, and then becomes more malleable and can be deposited on the printed object. It ends in a nozzle, which has a hole of usually 0.4 mm in diameter. It is possible to change the nozzle to get either more precise prints (smaller holes) or faster prints (larger holes)
The extruder is the part before the head, which will push the filament in (with a gear).
Depending on the printer, the driver can either be located directly above the head (called "direct drive") or offset elsewhere (called "bowden"). Both types have their advantages and disadvantages.
Most printheads contain Teflon (PTFE). This makes them easier to manufacture, but it prevents the use of some (less common) plastics that require temperatures above 260°C. This is something to consider when comparing printers.
Bed
The bed is the support where the object will be printed. It can be made of glass, metal or PEI (Polyetherimide)
Some types of plastics need heat to "stick" to the bed when the first layer is printed. For this reason, beds can be heated, usually to at least 60°C.
Materials
We have seen that FDM printing involves taking a plastic filament, and heating it to lay it on an object to be manufactured. As you might expect, there is not just one type of plastic: there are a good dozen that can be used, each with its own characteristics (strength, durability, colours, price, etc.). And there are even filaments that are not entirely made of plastic, but which are a mixture of plastic and something else: for example, there are plastic/wood mixtures, which make it possible to print an object that looks like... a wooden object.
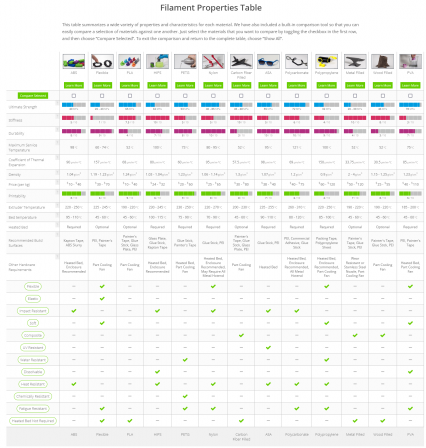
Here is an overview of the most common plastics:
- Polylactic acid (PLA): THE classic 3D printing material, because it is cheap, available in lots of colours, and easy to print (because yes: some plastics require more complicated settings, or even quality equipment). It is also good for the environment, as it is made from corn starch. It is very suitable for most decorative and functional objects, but if you want to "do better" (especially in terms of durability, UV tolerance, etc.) and have specific requirements, you can pick something else.
- Acrylonitrile butadiene styrene (ABS): It is known by the public because of Lego bricks, which are made with this plastic. It is a little more complicated to print than PLA (notably because it requires higher temperatures and has a tendency to come off the plate during printing - this is known as warping), but it has better mechanical properties (resistance to impact, temperature, etc.) which make it more interesting for certain applications, such as phone covers for example.
- TPE, TPU, TPC: a family of plastics which have the particularity of being flexible, therefore suitable if a more "elastic" object is required
- Polycarbonate (PC): a very strong plastic that is slightly transparent (this is what I printed the Ori I linked to at the beginning of the article). I jokingly call it "the royal plastic" 😆. It is more expensive than PLA or ABS and needs very high temperatures to print, so you cannot print it on all printers.
Some people make comparison charts of the different materials:
How do we print something?
Modelling the 3D object
First of all, you need to get a "schematic" of the 3D object. There are three possibilities:
- Either you model the object yourself, with 3D modelling software (Blender, Fusion 360, etc.). This is a complex subject and this article will not talk about that
- Or – lucky! – someone has already modelled the object and offers it for download
- Or you have a 3D scanner that produces a 3D model of the object.
Using a slicer
Once we have our 3D modelled object, can we give it to the printer to start printing? Of course not... it's not that simple.
You have to know that a 3D printer, in fact... is quite dumb. It does not know how to do anything by itself and needs to be told exactly what to do. And when I say "exactly", I mean things as simple as :
- moving the print head a certain number of centimetres on a certain axis
- pushing out plastic (or not)
- heating the head or the platen to a certain temperature
- ...
The printer actually expects "gcode" files. These are files that describe EVERY action the printer has to do. Here is a gcode example:
G92 E0 ;Reset Extruder
G1 Z2.0 F3000 ;Move Z Axis up
G1 X10.1 Y20 Z0.28 F5000.0 ;Move to start position
G1 X10.1 Y200.0 Z0.28 F1500.0 E15 ;Draw the first line
G1 X10.4 Y200.0 Z0.28 F5000.0 ;Move to side a little
G1 X10.4 Y20 Z0.28 F1500.0 E30 ;Draw the second line
G92 E0 ;Reset Extruder
G1 Z2.0 F3000 ;Move Z Axis up
G92 E0
G92 E0
To produce this file, we first need to import our model into a specific software, called a slicer.
Like 3D modelling software, there are many slicers. However, there are two that are widely used: Cura (developed by Ultimaker) and PrusaSlicer (developed by... Prusa). Both companies originally made these slicers for their own printers, but as all FDM 3D printers work the same way, it is possible to use them with any other brand and model (as long as you follow the manufacturer's instructions)
Slicers have a lot of parameters to adjust. The ones that are most often changed are:
- the temperature of the print head
- the temperature of the plate
- the filling of the object: hollow, empty, or between the two
- the use of supports (I will talk about this later)
- the use of the fan
- the printing speed
These parameters depend usually on the material you are using. Pre-programmed profiles exist to select the right values according to the materials and the printer model.
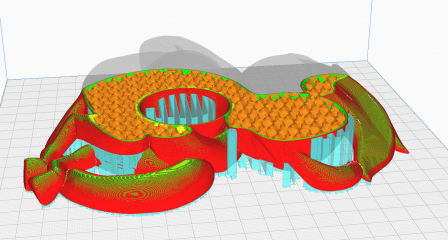
An example? Of course! Here is an Ori that has been run through a cutting software (here Cura). The software show us, layer by layer, the application of the material on the object, and tells us how long it will take to print. The colours on the object tell us "what the plastic applied here is for": red for the outer walls, green for the thickness, orange for the filling...
What does "object suitable for printing" mean?
This is maybe the point that confused me the most when I discovered 3D printing. I used to hear about "models suitable for 3D printing" and I wondered why some things could be printed and others not.
To understand the problem, I will show something that is impossible to print. Can you find out what the problem is? (if you read the article well, you should easily find out 😄)
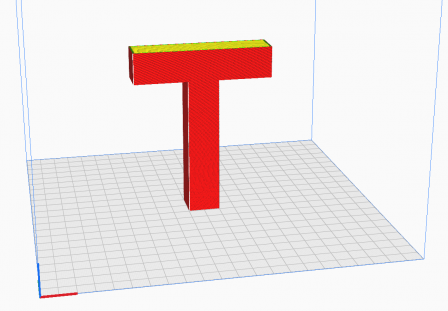
Answer: as we have seen before, an object is printed bottom-up. When we get to the "bar" of the T, the head will start to print it... but there will be nothing underneath to hold it! So the plastic will fall off and you will not be able to print the "bar".
The solution is to configure the slicer so it generates supports:
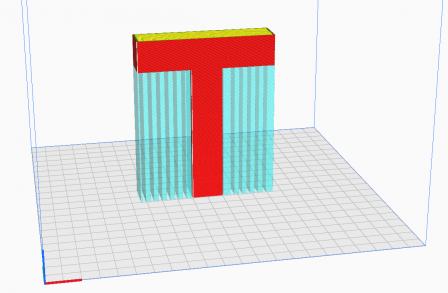
But removing the supports is a very tedious operation. In the case of the T, it is easy because the surface is flat, so you just need to file it. But as soon as you get to more complicated things like characters...
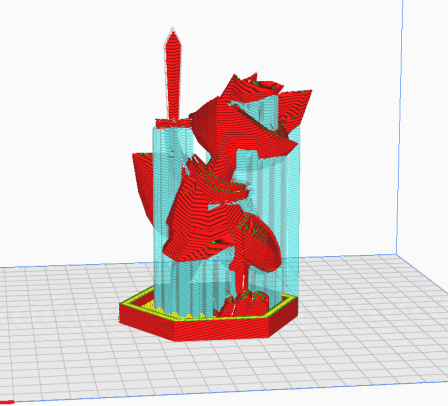
... have fun removing all the supports without damaging anything else!
In these cases, you may have to be clever to avoid using supports as much as possible. You can try rotating the model in the slicer to print it at a different angle (the aim being to get as close as possible to a pyramid shape). In the case of the T, you can just turn it upside down, so that the "bar" is at the bottom.
You can also change the parameters of the supports in the slicer, so that there are fewer of them (which always come with the risk of failing the print...).
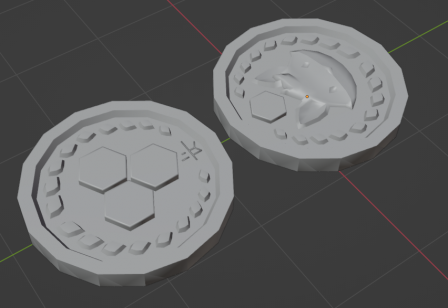
Sometimes the best solution is to edit the model to cut it into several parts, which can then be assembled. For example here, it was impossible to print this coin without needing supports on one side (which would have been almost impossible to remove without damaging the side). The solution was to cut the coin in half (like a sausage!) and then glue the two sides together after printing.
Going further
The all3dp website is a goldmine: almost every aspect of 3D printing (not just FDM) is covered in an article.
Sites where to find 3D printing models to download:
The r/3dprinting subreddit and its very useful links at the top of the page (wiki, buying tips...) is also interesting.
no comments